No artigo, “Automatizando o Desenvolvimento Embarcado: GitHub Actions com Franzininho WiFi”, configuramos um pipeline com três jobs principais: build, test e delivery. Ao final do pipeline, caso não haja erro em nenhum dos jobs, um release é automaticamente gerado no repositório do GitHub, contendo o arquivo .bin compilado como um dos ativos (assets).
Neste tutorial, vamos adaptar o código do firmware da Franzininho WiFi para implementar a funcionalidade de Atualização OTA (Over-the-Air). Se você ainda não leu o artigo mencionado, sugiro que volte nele para entender a estrutura básica do projeto antes de seguir com a implementação dessa nova funcionalidade. A atualização OTA permitirá que o firmware da sua placa seja atualizado remotamente, sem a necessidade de uma conexão física, simplificando a manutenção e a atualização do dispositivo.
Ajuste arquivo TempLightFlow.yml
No arquivo anterior, ao criar a release estávamos utilizando uma tag fixa, dessa forma:
delivery: # job responsável pela entrega do artefato gerado
    runs-on: ubuntu-latest
    permissions:
      contents: write
    needs: [test] # este job depende do job "test" ser bem sucedido
    steps:
      - name: Repo checkout
        uses: actions/checkout@v4 # clona o repositório do GitHub


      - name: Download artifacts
        uses: actions/download-artifact@v4 # baixa os artefatos gerados no job "build"
        with:
          name: TempLightFlow


      - name: Create release
        uses: ncipollo/release-action@v1.13.0 # action para criar release
        with:
          artifacts: "TempLightFlow.bin" # artefato que será criado na release
          tag: 0.1.5 # tag do release
          bodyFile: "body.md" #Arquivo contendo o corpo do release
No entanto, é necessário modificar está tag, pois o GitHub não permite que duas releases utilizem o mesmo nome de tag. Para evitar conflitos, podemos gerar uma nova tag dinamicamente com base na data e hora do momento da execução. Substitua a etapa correspondente no arquivo YAML pelo seguinte:

Os Melhores Treinamentos sobre Sistemas embarcados e IoT
Cursos com professores qualificados para acelerar sua carreira e projetos
delivery: # job responsável pela entrega do artefato gerado
    runs-on: ubuntu-latest
    permissions:
      contents: write
    needs: [test] # este job depende do job "test" ser bem sucedido
    steps:
      - name: Repo checkout
        uses: actions/checkout@v4 # clona o repositório do GitHub


      - name: Download artifacts
        uses: actions/download-artifact@v4 # baixa os artefatos gerados no job "build"
        with:
          name: TempLightFlow

      - name: Generate dynamic tag  # gerar tag dinamicamente
        id: generate_tag
        run: echo "tag=v$(date +'%Y%m%d%H%M%S')" >> $GITHUB_ENV


      - name: Create release
        uses: ncipollo/release-action@v1.13.0 # action criar release
        with:
          artifacts: "TempLightFlow.bin"
          tag: ${{ env.tag }}
          make_latest: true
Criação arquivo Kconfig.projbuild
O arquivo Kconfig.projbuild é usado para configurar opções específicas do projeto no ESP-IDF. Ele permite que você defina parâmetros customizáveis, como URLs, timeouts e outras configurações relacionadas ao seu firmware. Esses parâmetros aparecem no menu de configuração do ESP-IDF (idf.py menuconfig), facilitando a personalização sem alterar diretamente o código.
Atualize os campos default no arquivo abaixo para refletir as informações do seu projeto, substituindo:
- usuario: seu nome de usuário no GitHub.
- nome_repositorio: o nome do seu repositório.
- nome_binario: o nome do binário gerado pelo seu projeto.
Essa URL é responsável por buscar automaticamente o release mais recente disponível no GitHub. Ela acessa o repositório e retorna a versão bin mais atual do firmware.
menu "Example Configuration"


    config EXAMPLE_FIRMWARE_UPGRADE_URL
        string "Firmware Upgrade URL"
        default "https://github.com/usuario/nome_repositorio/releases/latest/download/nome_binario.bin"
        help
            URL of server which hosts the firmware image.


    config EXAMPLE_SKIP_COMMON_NAME_CHECK
        bool "Skip server certificate CN fieldcheck"
        default n
        help
            This allows you to skip the validation of OTA server certificate CN field.


    config EXAMPLE_SKIP_VERSION_CHECK
        bool "Skip firmware version check"
        default n
        help
            This allows you to skip the firmware version check.


    config EXAMPLE_OTA_RECV_TIMEOUT
        int "OTA Receive Timeout"
        default 5000
        help
            Maximum time for reception


    config EXAMPLE_ENABLE_PARTIAL_HTTP_DOWNLOAD
        bool "Enable partial HTTP download"
        default n
        help
            This enables use of Range header in esp_https_ota component.
            Firmware image will be downloaded over multiple HTTP requests.


    config EXAMPLE_HTTP_REQUEST_SIZE
        int "HTTP request size"
        default MBEDTLS_SSL_IN_CONTENT_LEN
        depends on EXAMPLE_ENABLE_PARTIAL_HTTP_DOWNLOAD
        help
            This options specifies HTTP request size. Number of bytes specified
            in this option will be downloaded in single HTTP request.


    config EXAMPLE_USE_CERT_BUNDLE
        bool "Enable certificate bundle"
        default n
        depends on MBEDTLS_CERTIFICATE_BUNDLE
        help
            Enable trusted root certificate bundle. This approach allows to have
            OTA updates functional with any public server without requirement
            to explicitly add its server certificate.
endmenu
No nosso projeto, vamos entrar no menuconfig e habilitar a opção “Enable certificate bundle” para garantir que o ESP32, ao se conectar a uma URL (geralmente via HTTPS), tenha acesso a um conjunto de certificados confiáveis. Ao habilitar essa opção, o ESP32 vai buscar automaticamente esse conjunto de certificados, permitindo que ele faça conexões seguras com a URL diretamente no seu projeto, sem depender de configurações adicionais.

No entanto, se preferir incluir o certificado diretamente no seu projeto, você pode desabilitar essa opção. Em seguida, crie uma pasta chamada server_certs no diretório do seu projeto e coloque o arquivo certificado.pem (do GitHub, por exemplo) dentro dessa pasta. Depois, adicione a referência do arquivo no CMakeLists.txt do diretório main. Dessa forma, o certificado será incorporado diretamente ao código do projeto, permitindo que o ESP32 utilize esse certificado para autenticação nas conexões HTTPS, sem depender do repositório de certificados do sistema.
idf_component_register(SRCS "main.c"
                    INCLUDE_DIRS "."
                    EMBED_TXTFILES ${project_dir}/server_certs/github_cert.pem
)
Ajuste arquivo main
No arquivo main.c, a ideia é incrementar a configuração da tarefa OTA (Over-the-Air) que será iniciada sempre que o botão 6 da Franzininho Wifi Lab for pressionado. Além disso, o código precisa verificar se a versão mais recente do release é diferente da versão instalada na placa antes de realizar o OTA. Caso a versão instalada seja a mesma, o processo de OTA não deve ser concluído. Siga os passos abaixos:
1 – Inclua as seguintes bibliotecas:
#include "esp_ota_ops.h"
#include "esp_http_client.h"
#include "esp_https_ota.h"


#include "nvs.h"
#include "nvs_flash.h"
#include "protocol_examples_common.h"


#ifdef CONFIG_EXAMPLE_USE_CERT_BUNDLE
#include "esp_crt_bundle.h"
#endif


#include "esp_wifi.h"
2 – Está sendo utilizado a biblioteca protocol_examples_common.h para facilitar a implementação de funcionalidades Wi-Fi. No arquivo idf_component.yml inclua a dependência dela
## IDF Component Manager Manifest File
dependencies:
  ## Required IDF version
  idf:
    version: '>=4.1.0'
  # # Put list of dependencies here
  # # For components maintained by Espressif:
  # component: "~1.0.0"
  # # For 3rd party components:
  # username/component: ">=1.0.0,<2.0.0"
  # username2/component2:
  #   version: "~1.0.0"
  #   # For transient dependencies `public` flag can be set.
  #   # `public` flag doesn't have an effect dependencies of the `main` component.
  #   # All dependencies of `main` are public by default.
  #   public: true
  zorxx/dht: ^1.0.1
  protocol_examples_common:
    path: ${IDF_PATH}/examples/common_components/protocol_examples_common
3 – Inclua as seguintes definições:
#define GPIO_BUTTON_PIN 2
#define DEBOUNCE_DELAY_MS 200
extern const uint8_t server_cert_pem_start[] asm("_binary_ca_cert_pem_start");
extern const uint8_t server_cert_pem_end[] asm("_binary_ca_cert_pem_end");
4 – Crie a tarefa OTA:
// OTA task
void ota_task(void *pvParameter)
{
    ESP_LOGI(TAG, "Starting Advanced OTA example");


    esp_err_t ota_finish_err = ESP_OK;
    esp_http_client_config_t config = {
        .url = CONFIG_EXAMPLE_FIRMWARE_UPGRADE_URL,  // URL for the OTA update
#ifdef CONFIG_EXAMPLE_USE_CERT_BUNDLE
        .crt_bundle_attach = esp_crt_bundle_attach,
#else
        .cert_pem = (char *)server_cert_pem_start,
#endif
        .timeout_ms = CONFIG_EXAMPLE_OTA_RECV_TIMEOUT,
        .keep_alive_enable = true,
        .buffer_size = 1024,
        .buffer_size_tx = 1024,
        .disable_auto_redirect = true,


    };


    // OTA configuration
    esp_https_ota_config_t ota_config = {
        .bulk_flash_erase = true,
        .http_config = &config,
#ifdef CONFIG_EXAMPLE_ENABLE_PARTIAL_HTTP_DOWNLOAD
        .partial_http_download = true,
        .max_http_request_size = CONFIG_EXAMPLE_HTTP_REQUEST_SIZE,
#endif
    };


    // Start the OTA process
    esp_https_ota_handle_t https_ota_handle = NULL;
    esp_err_t err = esp_https_ota_begin(&ota_config, &https_ota_handle);
    if (err != ESP_OK) {
        ESP_LOGE(TAG, "ESP HTTPS OTA Begin failed");
        vTaskDelete(NULL);
    }


    // Get and validate the image description of the new firmware
    esp_app_desc_t app_desc;
    err = esp_https_ota_get_img_desc(https_ota_handle, &app_desc);
    if (err != ESP_OK) {
        ESP_LOGE(TAG, "esp_https_ota_read_img_desc failed");
        goto ota_end;
    }
    err = validate_image_header(&app_desc);
    if (err != ESP_OK) {
        ESP_LOGE(TAG, "Image header verification failed");
        goto ota_end;
    }


    // Perform the OTA process (download and write to flash)
    while (1) {
        err = esp_https_ota_perform(https_ota_handle);
        if (err != ESP_ERR_HTTPS_OTA_IN_PROGRESS) {
            break;
        }
        ESP_LOGD(TAG, "Image bytes read: %d", esp_https_ota_get_image_len_read(https_ota_handle));
    }


    // Check if the entire OTA data was received
    if (esp_https_ota_is_complete_data_received(https_ota_handle) != true) {
        ESP_LOGE(TAG, "Complete data was not received.");
    } else {
        ota_finish_err = esp_https_ota_finish(https_ota_handle);
        if ((err == ESP_OK) && (ota_finish_err == ESP_OK)) {
            ESP_LOGI(TAG, "ESP_HTTPS_OTA upgrade successful. Rebooting ...");
            vTaskDelay(1000 / portTICK_PERIOD_MS);  // Delay for stability before rebooting
            esp_restart();  // Restart the ESP32 to apply the new firmware
        } else {
            if (ota_finish_err == ESP_ERR_OTA_VALIDATE_FAILED) {
                ESP_LOGE(TAG, "Image validation failed, image is corrupted");
            }
            ESP_LOGE(TAG, "ESP_HTTPS_OTA upgrade failed 0x%x", ota_finish_err);
            vTaskDelete(NULL);
        }
    }


ota_end:
    esp_https_ota_abort(https_ota_handle);
    ESP_LOGE(TAG, "ESP_HTTPS_OTA upgrade failed");
    vTaskDelete(NULL);
}
Nessa etapa, alguns pontos importantes são:
- Configuração do Cliente HTTP (esp_http_client_config_t): A URL do servidor que fornece a atualização OTA é configurada aqui, juntamente com as opções de certificados (usando bundle ou certificado PEM) e outros parâmetros de tempo de espera, buffer e redirecionamento.
- Início do Processo OTA (esp_https_ota_begin): A função esp_https_ota_begin() inicia o processo de OTA, configurando o download da nova imagem. Se falhar, o processo é abortado.
- Verificação e Download da Imagem (esp_https_ota_perform): O processo realiza o download da nova imagem e verifica se o cabeçalho da imagem e os dados estão corretos. Aqui também verifica se o firmware é diferente da versão atual gravada.
- Finalização e Reinicialização (esp_https_ota_finish): Quando o download e a verificação são concluídos, a função esp_https_ota_finish() valida a imagem e, se bem-sucedido, reinicia o ESP32 para aplicar o novo firmware. Caso contrário, o processo é abortado.
5 – Crie a função que verifica a versão do firmware e válida a imagem nova:
// Função validação imagem novo firmware
static esp_err_t validate_image_header(esp_app_desc_t *new_app_info)
{
    if (new_app_info == NULL) {
        return ESP_ERR_INVALID_ARG;
    }


    const esp_partition_t *running = esp_ota_get_running_partition();
    esp_app_desc_t running_app_info;
    if (esp_ota_get_partition_description(running, &running_app_info) == ESP_OK) {
        ESP_LOGI(TAG, "Running firmware version: %s", running_app_info.version);
    }


#ifndef CONFIG_EXAMPLE_SKIP_VERSION_CHECK
    // Check if the current version is the same as the new version
    if (memcmp(new_app_info->version, running_app_info.version, sizeof(new_app_info->version)) == 0) {
        ESP_LOGW(TAG, "Current running version is the same as the new one. We will not continue the update.");
        return ESP_FAIL;
    }
#endif


    return ESP_OK;
}
6 – Crie o event_handler que captura eventos específicos durante a execução do processo de OTA:
static void event_handler(void* arg, esp_event_base_t event_base,
                          int32_t event_id, void* event_data)
{
    if (event_base == ESP_HTTPS_OTA_EVENT) {
        switch (event_id) {
            case ESP_HTTPS_OTA_START:
                ESP_LOGI(TAG, "OTA started");
                break;
            case ESP_HTTPS_OTA_CONNECTED:
                ESP_LOGI(TAG, "Connected to server");
                break;
            case ESP_HTTPS_OTA_GET_IMG_DESC:
                ESP_LOGI(TAG, "Reading Image Description");
                break;
            case ESP_HTTPS_OTA_VERIFY_CHIP_ID:
                ESP_LOGI(TAG, "Verifying chip id of new image: %d", *(esp_chip_id_t *)event_data);
                break;
            case ESP_HTTPS_OTA_DECRYPT_CB:
                ESP_LOGI(TAG, "Callback to decrypt function");
                break;
            case ESP_HTTPS_OTA_WRITE_FLASH:
                ESP_LOGD(TAG, "Writing to flash: %d written", *(int *)event_data);
                break;
            case ESP_HTTPS_OTA_UPDATE_BOOT_PARTITION:
                ESP_LOGI(TAG, "Boot partition updated. Next Partition: %d", *(esp_partition_subtype_t *)event_data);
                break;
            case ESP_HTTPS_OTA_FINISH:
                ESP_LOGI(TAG, "OTA finish");
                break;
            case ESP_HTTPS_OTA_ABORT:
                ESP_LOGI(TAG, "OTA abort");
                break;
        }
    }
}
7 – Crie a função que verifica se o botão 6 foi pressionado,com controle de debounce implementado:
bool is_button_pressed()
{
    static uint32_t last_press_time = 0;
    uint32_t current_time = xTaskGetTickCount() * portTICK_PERIOD_MS;


    // Check if the button is pressed (low level)
    if (gpio_get_level(GPIO_BUTTON_PIN) == 1)
    {
        // Check if the debounce delay has passed
        if (current_time - last_press_time > DEBOUNCE_DELAY_MS)
        {
            last_press_time = current_time;
            return true;
        }
    }
8 – Por fim, vamos modificar o main. Ele exibirá as informações do firmware gravado na placa, inicializará a tarefa do dht e quando o botão for pressionado chamará a tarefa OTA.
// Função principal
void app_main(void) {
    ESP_LOGI(TAG, "TEMPLIGHTFLOW app_main start");


    const esp_partition_t *running_partition = esp_ota_get_running_partition();
    esp_app_desc_t running_app_info;
    if (esp_ota_get_partition_description(running_partition, &running_app_info) == ESP_OK) {
        ESP_LOGI(TAG, "Firmware Information:");
        ESP_LOGI(TAG, "  Version: %s", running_app_info.version);
        ESP_LOGI(TAG, "  Project Name: %s", running_app_info.project_name);
        ESP_LOGI(TAG, "  Compile Time: %s", running_app_info.time);
        ESP_LOGI(TAG, "  Compile Date: %s", running_app_info.date);
        ESP_LOGI(TAG, "  IDF Version: %s", running_app_info.idf_ver);
        ESP_LOGI(TAG, "  Secure Version: %" PRIu32, running_app_info.secure_version);
        ESP_LOGI(TAG, "  Magic Word: 0x%" PRIx32, running_app_info.magic_word);
        ESP_LOGI(TAG, "  Minimal eFuse block revision: %d", running_app_info.min_efuse_blk_rev_full);
        ESP_LOGI(TAG, "  Maximal eFuse block revision: %d", running_app_info.max_efuse_blk_rev_full);
        ESP_LOGI(TAG, "  ELF SHA256: ");
        for (int i = 0; i < sizeof(running_app_info.app_elf_sha256); i++) {
            printf("%02x", running_app_info.app_elf_sha256[i]);
        }
        printf("\n");
    } else {
        ESP_LOGE(TAG, "Failed to get running firmware information");
    }


    // Initialize NVS (Non-Volatile Storage)
    esp_err_t err = nvs_flash_init();
    if (err == ESP_ERR_NVS_NO_FREE_PAGES || err == ESP_ERR_NVS_NEW_VERSION_FOUND) {
        ESP_ERROR_CHECK(nvs_flash_erase());
        err = nvs_flash_init();
    }
    ESP_ERROR_CHECK( err );


    ESP_ERROR_CHECK(esp_netif_init());  // Initialize network interface
    ESP_ERROR_CHECK(esp_event_loop_create_default());  // Create the default event loop
    ESP_ERROR_CHECK(esp_event_handler_register(ESP_HTTPS_OTA_EVENT, ESP_EVENT_ANY_ID, &event_handler, NULL));
    // Connect to Wi-Fi or Ethernet (based on configuration)
    ESP_ERROR_CHECK(example_connect());

    xTaskCreate(dht_task, "dht_task", configMINIMAL_STACK_SIZE * 3, NULL, 5, NULL);


    // Main loop to check button press and start OTA
    while (1) {
        if (is_button_pressed()) {
            ESP_LOGI(TAG, "Starting OTA...");
            // Create OTA task when button is pressed
            xTaskCreate(&ota_task, "ota_task", 8192, NULL, 5, NULL);
        }
        vTaskDelay(100 / portTICK_PERIOD_MS);  // Delay between button checks (100 ms)
    }
}
Gravação código
Abra o menu config, configure o ssid e a senha da sua rede e grave o código em sua placa.

Após configurar estes parâmetros, grave o código na sua placa. Quando o processo de gravação for concluído com sucesso, você deverá ver a seguinte saída no terminal:

Envio de Novo Código para o GitHub e Abertura de Pull Request
Na função update_leds, vamos adicionar alguns logs que ajudarão a verificar se o firmware será atualizado corretamente.
void update_leds(int16_t temperature) {
    // Apaga todos os LEDs
    gpio_set_level(LED_RED, 0);
    gpio_set_level(LED_GREEN, 0);
    gpio_set_level(LED_BLUE, 0);


    // Acende o LED correspondente
    if (temperature > TEMP_HIGH) {
        gpio_set_level(LED_RED, 1);
        ESP_LOGI(TAG, "Temperatura alta!");
    } else if (temperature > TEMP_LOW) {
        gpio_set_level(LED_GREEN, 1);
        ESP_LOGI(TAG, "Temperatura ok!");
    } else {
        gpio_set_level(LED_BLUE, 1);
        ESP_LOGI(TAG, "Temperatura baixa!");


    }
}
Depois, use os seguintes comandos para criar uma nova branch e enviar as novas atualizações do código para o GitHub:
git checkout -b ota
git add .
git commit -m "test ota"
git push origin ota
Use o mesmo processo explicado no artigo “Automatizando o Desenvolvimento Embarcado: GitHub Actions com Franzininho WiFi” para abrir uma pull request. Quando os jobs forem concluídos com sucesso, realize o merge na main clicando em “Merge pull request”.

Após esse processo, você deverá ver uma nova release em seu repositório.

Teste da Atualização OTA
Pressione o botão 6 e verifique se o processo de atualização OTA foi iniciado e concluído com sucesso. Ao pressionar o botão, o dispositivo deverá baixar a versão mais recente do release e atualizar automaticamente o firmware. Acompanhe as informações geradas no monitor serial.
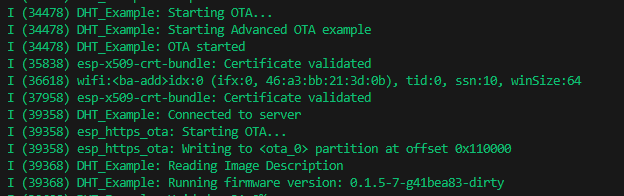

No meu exemplo, o novo firmware foi gravado na versão “dc51fa4”. Agora, além de exibir os valores de temperatura e umidade, o firmware também mostra logs indicando se a temperatura está alta, ok ou baixa.

Se você pressionar o botão novamente, o firmware não será regravado, pois a versão mais recente já está instalada na placa. No entanto, se você fizer modificações, subir as alterações no GitHub, criar um novo pull request e uma nova release for criada, o firmware será atualizado ao pressionar o botão.

Conclusão
Neste tutorial, utilizamos o projeto feito no artigo “Automatizando o Desenvolvimento Embarcado: GitHub Actions com Franzininho WiFi” e adicionamos a funcionalidade de atualização OTA (Over-the-Air). A atualização OTA simplifica o processo de manutenção, permitindo que o firmware da placa seja atualizado remotamente, sem a necessidade de conexões físicas. A integração com o GitHub Actions automatiza a entrega do firmware, gerando uma nova release automaticamente sempre que uma atualização estiver disponível.
Referências
- Repositório do projeto: Graziele-Rodrigues/TEMPLIGHTFLOW
- A implementação da funcionalidade OTA foi baseada no módulo OTA do curso Academia ESP32 Profissional, de Fabio Souza, que oferece uma explicação detalhada sobre o processo, além de outros exemplos.