
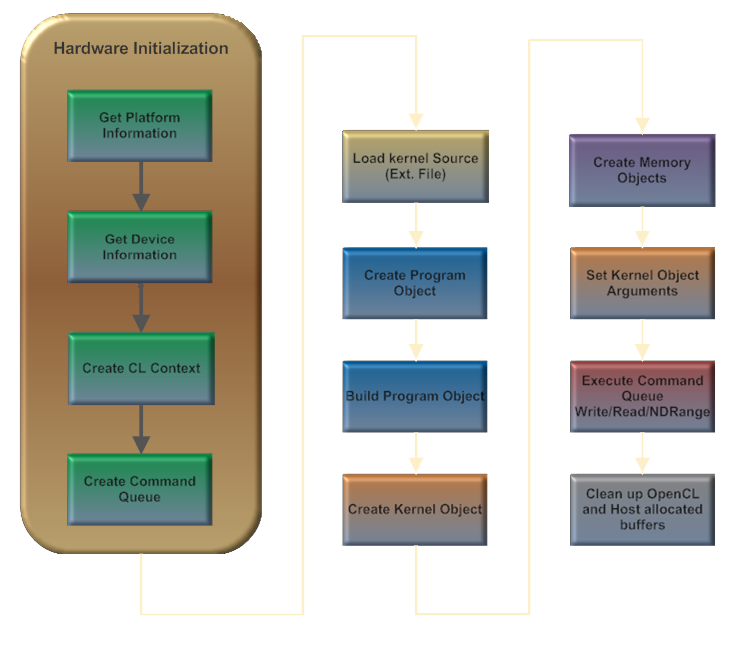
Passo 1 – Definindo o tamanho do problema
Em nossa aplicação Hello World o tamanho de nosso Global work-group é 512, populado com dados randômicos (apenas para teste). Também é necessário setar o tamanho do nosso Local work-group (Global work-group data access). Baseado no último post, o tamanho preferido do Local work-group é 16 (por dimensão), e nós iremos utilizar esse valor para garantir uma melhor perfomance.
        cl_platform_id  platform_id;
        cl_device_id  device_id;
        cl_context  context;
        cl_command_queue cq;
        cl_program  program;
        cl_kernel  kernel;
        cl_mem helloworld_mem_input = NULL;
        cl_mem helloworld_mem_output = NULL;

        // one dimensional work-items
 int dimension = 1;

 // our problem size
 size_t global = 512;

 // preferred work-group size
 size_t local = 16;

 int size;

 // input data buffer - random values for the helloworld sample
 char *input_data_buffer;

 // output data_buffer for results
 char *output_data_buffer;

 cl_int ret;

        // make our size equals our global work-group size
 size = global;

 input_data_buffer = (char *) malloc (sizeof (char) * size);
 if (! input_data_buffer)
 {
  printf ("\nFailed to allocate input data buffer memory\n");
  return 0;
 }

 output_data_buffer = (char *) malloc (sizeof (char) * size);
 if (! output_data_buffer)
 {
  printf ("\nFailed to allocate output data buffer memory\n");
  return 0;
 }

 // populate data_buffer with random values
 for (int i = 0; i < size; i++)
 {
  input_data_buffer[i] = rand () % 255;
 }

Os Melhores Treinamentos sobre Sistemas embarcados e IoT
Cursos com professores qualificados para acelerar sua carreira e projetos
Passo 2 – Inicialização do Hardware
Este é um passo básico para uma aplicação OpenCL. A Inicialização de hardware consiste de:
- Listar as plataformas disponíveis (uma GC2000);
- Descobrir as informações computacionais do device (Vivante OCL EP device);
- Criar o CL Context;
- Criar a Command Queue (Informação de controle do Host para o Device).
 cl_uint  platforms, devices;
 cl_int error;

 //-------------------------------------------
 // cl_int clGetPlatformIDs (cl_uint num_entries, cl_platform_id *platforms, cl_uint *num_platforms)
 //--------------------------------------------
 error = clGetPlatformIDs (1, &platform_id, &platforms);
 if (error != CL_SUCCESS)
  return CL_ERROR;

 //--------------------------------------------
 // cl_int clGetDeviceIDs (cl_platform_id platform, cl_device_type device_type, cl_uint num_entries,
 //   cl_device_id *devices, cl_uint *num_devices)
 //--------------------------------------------
 error = clGetDeviceIDs (platform_id, CL_DEVICE_TYPE_GPU, 1, &device_id, &devices);
 if (error != CL_SUCCESS)
  return CL_ERROR;

 //--------------------------------------------
 // cl_context clCreateContext (cl_context_properties *properties, cl_uint num_devices,
 //    const cl_device_id *devices, void *pfn_notify (const char *errinfo,
 //    const void *private_info, size_t cb, void *user_data),
 //    void *user_data, cl_int *errcode_ret)
 //----------------------------------------------
 cl_context_properties properties[] = {CL_CONTEXT_PLATFORM, (cl_context_properties)platform_id, 0};
 context = clCreateContext (properties, 1, &device_id, NULL, NULL, &error);
 if (error != CL_SUCCESS)
  return CL_ERROR;

 //----------------------------------------------
 // cl_command_queue clCreateCommandQueue (cl_context context, cl_device_id device,
 //     cl_command_queue_properties properties, cl_int *errcode_ret)
 //-----------------------------------------------
 cq = clCreateCommandQueue (context, device_id, 0, &error);
 if (error != CL_SUCCESS)
  return CL_ERROR;
Passo 3 – Crie os OCL Objects (Programa, Kernel e Memória)
 cl_int error = CL_SUCCESS;

 //----------------------------------------------
 // cl_program clCreateProgramWithSource (cl_context context, cl_uint count, const char **strings,
 //          const size_t *lengths, cl_int *errcode_ret)
 //------------------------------------------------
 program = clCreateProgramWithSource (context, 1, (const char **)kernel_src, &kernel_size, &error);
 if (error != CL_SUCCESS)
 {
  return CL_ERROR;
 }

 //------------------------------------------------
 // cl_int clBuildProgram (cl_program program, cl_uint num_devices, const cl_device_id *device_list,
 //   const char *options, void (*pfn_notify)(cl_program, void *user_data), void *user_data)
 //-------------------------------------------------
 error = clBuildProgram (program, 1, &device_id, "", NULL, NULL);
 if (error < 0)
 {
  //---------------------------------------------------
  // cl_int clGetProgramBuildInfo ( cl_program  program, cl_device_id  device, cl_program_build_info
  //   param_name, size_t  param_value_size, void  *param_value, size_t  *param_value_size_ret)
  //---------------------------------------------------
  clGetProgramBuildInfo(program, device_id, CL_PROGRAM_BUILD_LOG, kernel_size, kernel_src, NULL);
  printf ("\n%s", kernel_src);
 }

 //---------------------------
 // cl_kernel clCreateKernel (cl_program  program, const char *kernel_name, cl_int *errcode_ret)
        // "hello_world" is the name of our kernel function inside the external file.
 //---------------------------
        kernel = clCreateKernel (program, "hello_world", &error );
 if (error != CL_SUCCESS)
 {
  return CL_ERROR;
 }

 //---------------------------
 // cl_mem clCreateBuffer (cl_context context, cl_mem_flags flags, size_t size,
 //    void *host_ptr, cl_int *errcode_ret)
 //----------------------------
 helloworld_mem_input = clCreateBuffer (context, CL_MEM_READ_ONLY, size, NULL, &error);

 if (error!= CL_SUCCESS)
 {
                 return CL_ERROR;
 }

 helloworld_mem_output = clCreateBuffer (context, CL_MEM_WRITE_ONLY, size, NULL, &error);

 if (error!= CL_SUCCESS)
 {
   return CL_ERROR
 }
STEP 4 – Argumentos do Kernel
 //-----------------------------
 // cl_int clSetKernelArg (cl_kernel kernel, cl_uint arg_index, size_t arg_size,
 //       const void *arg_value)
 //-------------------------------
 clSetKernelArg (kernel, 0, sizeof(cl_mem), &helloworld_mem_input);
 clSetKernelArg (kernel, 1, sizeof(cl_mem), &helloworld_mem_output);
Passo 5 – Execute o Kernel (Command Queue)
Este é o lugar onde a mágica acontece. Nós escrevemos os dados do host para o device, mandando o sinal de start para o device para executar o kernel e finalmente lê os dados do device para o host. É dessa forma que funciona:
- clEnqueueWriteBuffer: Escreve dados no device;
- clEnqueueNDRangeKernel: inicia a execução do kernel;
- clEnqueueReadBuffer: Lê os dados do device.
 //-------------------------------
 // cl_int clEnqueueWriteBuffer (cl_command_queue command_queue, cl_mem buffer,
 //        cl_bool blocking_write, size_t offset, size_t cb,
 //        const void *ptr, cl_uint num_events_in_wait_list,
 //        const cl_event *event_wait_list, cl_event *event)
 //---------------------------------
 error = clEnqueueWriteBuffer(cq, helloworld_mem_input, CL_TRUE, 0, size, input_data_buffer, 0, NULL, NULL);
 if (error != CL_SUCCESS)
  return CL_ERROR

 //-------------------------------
 // cl_int clEnqueueNDRangeKernel (cl_command_queue command_queue, cl_kernel kernel,
 //        cl_uint work_dim, const size_t *global_work_offset,
 //        const size_t *global_work_size, const size_t *local_work_size,
 //        cl_uint num_events_in_wait_list, const cl_event *event_wait_list,
 //        cl_event *event)
 //---------------------------------
 error = clEnqueueNDRangeKernel (cq, kernel, dimension, NULL, &global, &local, 0, NULL, NULL);
 if  (ret == CL_SUCCESS)
 {
  //------------------------------------
  // cl_int clEnqueueReadBuffer (cl_command_queue command_queue, cl_mem buffer,
  //        cl_bool blocking_read, size_t offset, size_t cb,
  //        void *ptr, cl_uint num_events_in_wait_list,
  //        const cl_event *event_wait_list, cl_event *event)
  //----------------------------------------
  error = clEnqueueReadBuffer(cq, helloworld_mem_output, CL_TRUE, 0, size, output_data_buffer, 0, NULL, NULL);
 }
 else
  return CL_ERROR
Passo 5 – Limpe os OpenCL Objects
 clFlush( cq);
 clFinish(cq);

 clReleaseContext(context);
 clReleaseProgram(program);
 clReleaseCommandQueue(cq);
 clReleaseKernel (kernel);
 clReleaseMemObject (helloworld_mem_input);
 clReleaseMemObject (helloworld_mem_output);
Considerações finais
A aplicação apresentada neste post mostra como criar um aplicação básica baseada em OpenCL e pode se tornar tão complicada quanto o usuário quiser.
O código fonte completo e funcional pode ser baixado de meu github. Para mais informações sobre a API OpenCL EP, acesse o website Khronos.
Espero que as informações compartilhadas nesse post possam ajudá-los e os guie em projetos futuros.
Esse post foi originalmente publicado no blog Computer Vision on i.MX Processors em inglês neste link e traduzido por Thiago Lima com autorização do Autor André Silva.


Ola! Estou tentanto colocar este exemplo para rodar, a unica diferença é que para a compilação utilizo cmake. (eu acho todas as dependencias) — The C compiler identification is GNU 4.8.2 — The CXX compiler identification is GNU 4.8.2 — Check for working C compiler: /opt/poky/1.6.2/sysroots/x86_64-pokysdk-linux/usr/bin/arm-poky-linux-gnueabi/arm-poky-linux-gnueabi-gcc — Check for working C compiler: /opt/poky/1.6.2/sysroots/x86_64-pokysdk-linux/usr/bin/arm-poky-linux-gnueabi/arm-poky-linux-gnueabi-gcc — works — Detecting C compiler ABI info — Detecting C compiler ABI info – done — Detecting C compile features — Detecting C compile features – done — Check for working CXX compiler: /opt/poky/1.6.2/sysroots/x86_64-pokysdk-linux/usr/bin/arm-poky-linux-gnueabi/arm-poky-linux-gnueabi-g++ — Check for working CXX compiler: /opt/poky/1.6.2/sysroots/x86_64-pokysdk-linux/usr/bin/arm-poky-linux-gnueabi/arm-poky-linux-gnueabi-g++ — works — Detecting CXX… Leia mais »
Boas novas, Consegui compilar o codigo abaixo e testa-lo , a minha falha era não incluir o diretorio de include corretamente. Porem ao executar tenho um problema: root@imx6:~# ./OpenCL Initializing OpenCL: Ok -=-=-=- Platform Information -=-=-=- Platform Name: Vivante OpenCL Platform Platform Profile: EMBEDDED_PROFILE Platform Version: OpenCL 1.1 Platform Vendor: Vivante Corporation -=-=-=- Device Information -=-=-=- Device Name: Vivante OpenCL Device Device Profile: EMBEDDED_PROFILE Device Version: OpenCL 1.1 Device Vendor: Vivante Corporation Device Max Work Item Dimensions: 3-D Device Max Work Group Size: 1024 -=-=-=-=-=-=-=-=-=-=-=-=-=-=-=-=-=-=- Loading CL programs: hello_world Ok *** Error in `./OpenCL’: malloc(): memory corruption: 0x011f4d90 *** alguma… Leia mais »